カスタムダイアログを作ってみたので忘れないうちにアップしたいと思います
ダイアログは今後アプリを作っていくとなると色々なところで使う機会が出てくると思いますので、ここで紹介しておきます
今回はアプリとは別なので番外編という枠にしています
正直、、結構時間かかりました。。。ダイアログの作り方は調べれば色々とのってたりしますが、デザインを凝って作りたいとなるとあまり情報が少ないように感じます
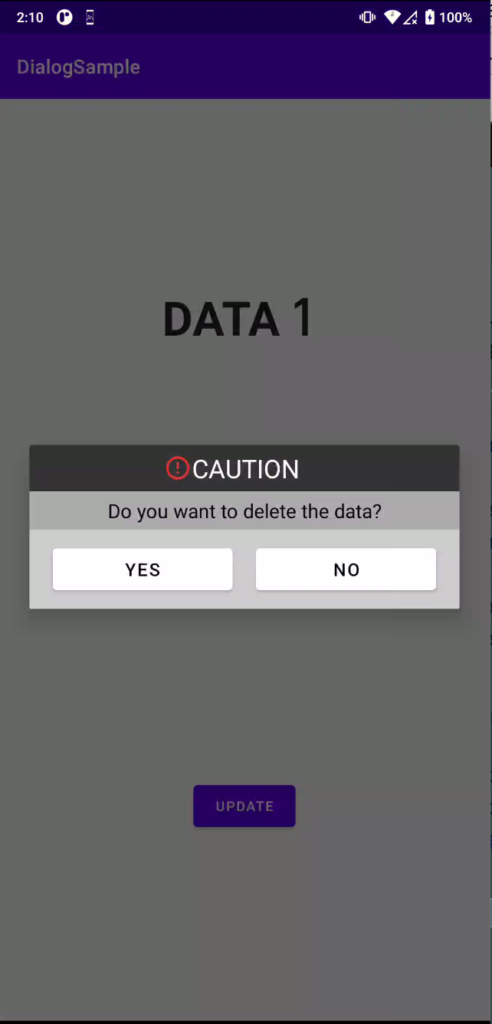
今回、アプリ内データを削除する場合のダイアログを作ってみました
アプリを開いたら”DATA 1″というデータが保存され、それが画面に表示されます
↓
DELETEボタンを押すとカスタムダイアログが表示されます
↓
ダイアログ内のYESを押すと、保存されたものが消されます
↓
消去後、完了メッセージがダイアログで表示されます
↓
UPDATEボタンを押すとテキストが更新されて”NO DATA”と表示されるはずです
データ保存には、共有プリファレンスというデータを端末内に保存するための簡単な方法を用いています
ではさっそくコードを書いていきましょう!
フラグメントファイルを作成
javaファイルにコードを書く
package com.example.dialogsample;

import android.app.Dialog;
import android.content.Context;
import android.os.Bundle;
import android.view.LayoutInflater;
import android.view.View;
import androidx.appcompat.app.AlertDialog;
import androidx.fragment.app.DialogFragment;


public class DeleteDialogFragment extends DialogFragment {
    @Override
    public Dialog onCreateDialog(Bundle savedInstanceState) {
        AlertDialog.Builder builder = new AlertDialog.Builder(getActivity());

        LayoutInflater inflater = (LayoutInflater)getActivity().getSystemService(Context.LAYOUT_INFLATER_SERVICE);
        View content = inflater.inflate(R.layout.dialog_delete, null);

        builder.setView(content);

        return builder.create();
    }
}
まずダイアログ専用のファイルを作成していきます
フラグメントファイルを作成し、DialogFragmentを継承させます
レイアウトで使うカラーをcolors.xmlに登録
<?xml version="1.0" encoding="utf-8"?>
<resources>
    <color name="purple_200">#FFBB86FC</color>
    <color name="purple_500">#FF6200EE</color>
    <color name="purple_700">#FF3700B3</color>
    <color name="teal_200">#FF03DAC5</color>
    <color name="teal_700">#FF018786</color>
    <color name="black">#FF000000</color>
    <color name="white">#FFFFFFFF</color>

<!--以下を追加-->
    <color name="cautionBack">#FF333333</color>
    <color name="messageBack">#FFAAAAAA</color>
    <color name="buttonBack">#FFEEEEEE</color>
</resources>
フラグメントのレイアウトを作成していく前に使用するカラーを登録しておきます
レイアウトファイル(xml)を作成
<?xml version="1.0" encoding="utf-8"?>

<LinearLayout xmlns:android="http://schemas.android.com/apk/res/android"
    android:layout_width="match_parent"
    android:layout_height="match_parent"
    android:background="#CCCCCC"
    android:orientation="vertical">

    <LinearLayout
        android:layout_width="match_parent"
        android:layout_height="wrap_content"
        android:orientation="horizontal">

        <TextView
            android:id="@+id/textViewBack1"
            android:layout_width="wrap_content"
            android:layout_height="match_parent"
            android:layout_weight="10"
            android:background="@color/cautionBack" />

        <TextView
            android:id="@+id/textView1"
            android:drawableLeft="@drawable/ic_alert"
            android:layout_width="wrap_content"
            android:layout_height="match_parent"
            android:background="@color/cautionBack"
            android:gravity="center"
            android:layout_gravity="center"
            android:padding="5dp"
            android:text="CAUTION"
            android:textColor="@color/white"
            android:textSize="26sp" />

        <TextView
            android:id="@+id/textViewBack2"
            android:layout_width="wrap_content"
            android:layout_height="match_parent"
            android:layout_weight="12"
            android:background="@color/cautionBack" />

    </LinearLayout>


    <TextView
        android:id="@+id/textView2"
        android:layout_width="match_parent"
        android:layout_height="wrap_content"
        android:background="@color/messageBack"
        android:gravity="center"
        android:padding="5dp"
        android:text="Do you want to delete the data?"
        android:textColor="@color/black"
        android:textSize="20sp" />


    <LinearLayout
        android:layout_width="match_parent"
        android:layout_height="wrap_content"
        android:layout_marginTop="10dp"
        android:layout_marginBottom="10dp"
        android:backgroundTint="@color/buttonBack"
        android:orientation="horizontal">

        <Button
            android:id="@+id/posBtn"
            android:layout_width="0dp"
            android:layout_height="wrap_content"
            android:layout_weight="1"
            android:layout_marginLeft="20dp"
            android:layout_marginRight="20dp"
            android:backgroundTint="@color/white"
            android:onClick="positive"
            android:padding="2dp"
            android:text="YES"
            android:textColor="@color/black"
            android:textSize="18sp" />

        <Button
            android:id="@+id/negBtn"
            android:layout_width="0dp"
            android:layout_height="wrap_content"
            android:layout_weight="1"
            android:layout_marginRight="20dp"
            android:backgroundTint="@color/white"
            android:onClick="negative"
            android:padding="2dp"
            android:text="NO"
            android:textColor="@color/black"
            android:textSize="18sp" />
    </LinearLayout>

</LinearLayout>
フラグメントのレイアウトを作成します
LinearLayoutを用いて水平、垂直にテキストやボタンを配置していきます
ボタンには押した時に呼び出されるメソッドをandroid:onClickを使って登録しておきます(メソッドはこの後書いていきます)
また先ほど登録したカラーを用いてデザインを変えていきます
23行目の”@drawable/ic_alert”はAndroidStudioで元々用意されているベクターアセットを用いてアイコンを導入しています
以下がその導入方法になります
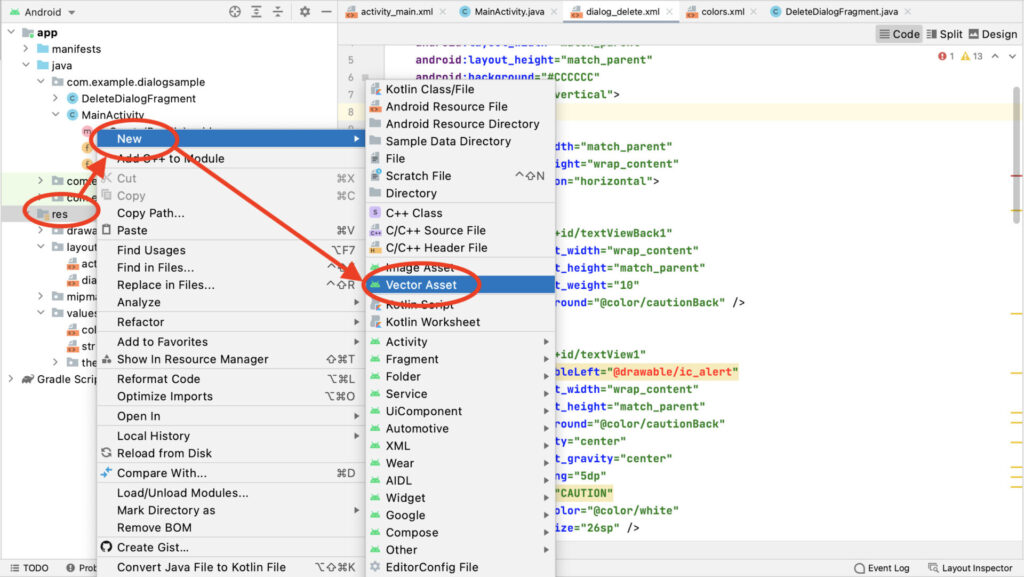
“res”を右クリックしてベクターアセットを新規作成します
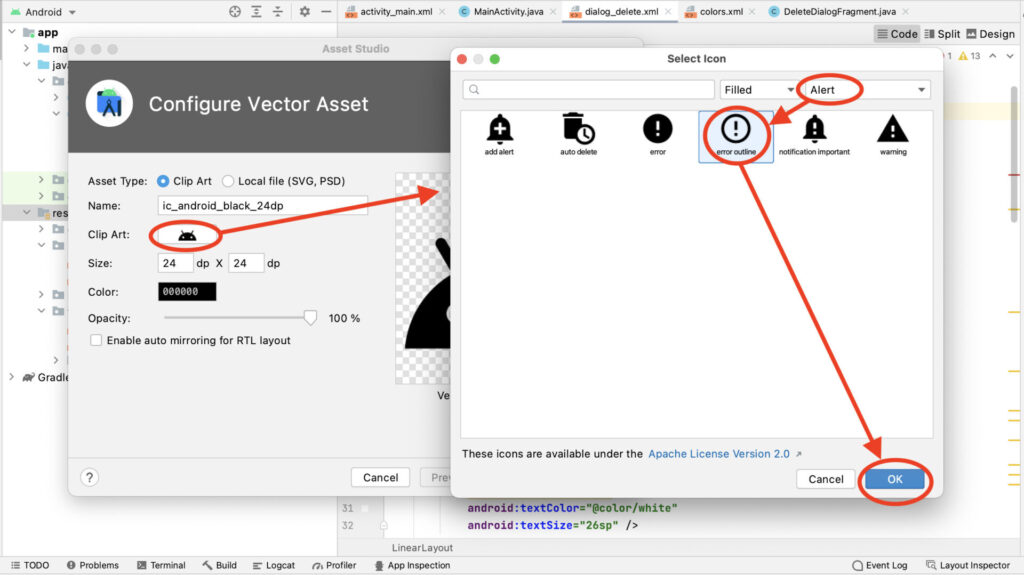
“Clip Art”を押して、開いたウィンドウ内でAlertと検索するとちょうど良いアイコンが出てきます
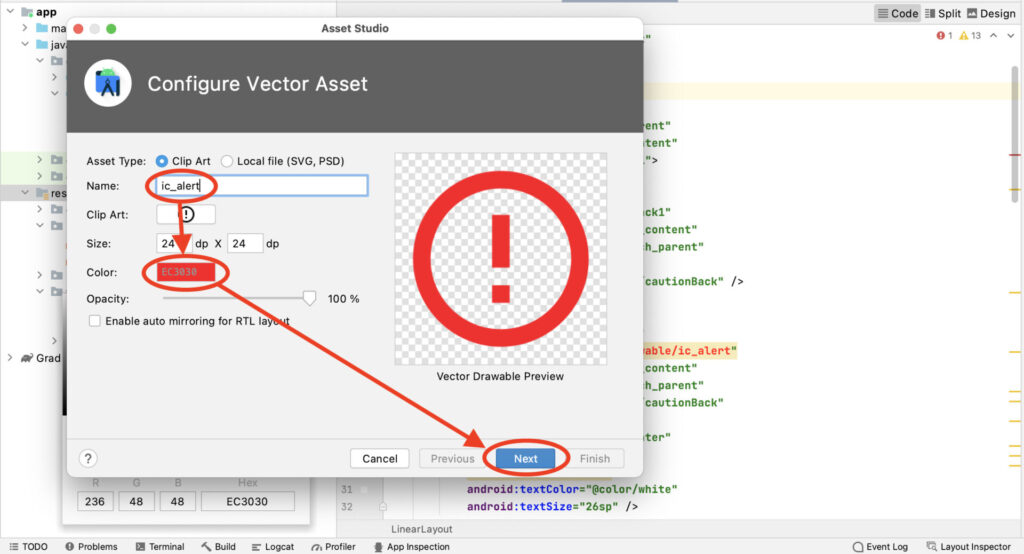
選んだアイコンの名前、色を変更します
今回はアラートなので名前は”ic_alert”で、色は赤色にしました
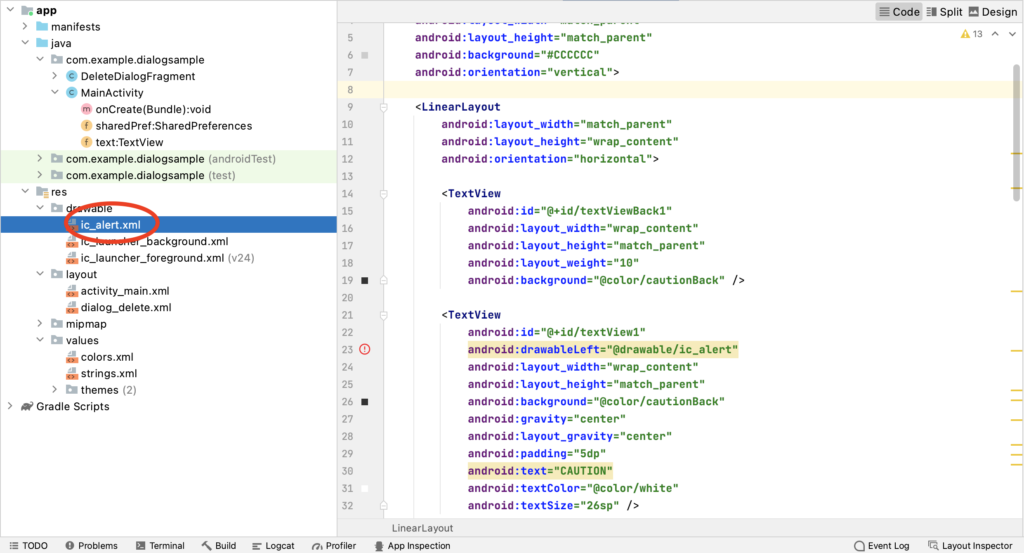
このように追加されます
メインファイルにコードを書く!
javaファイルにコードを書く
package com.example.dialogsample;

import androidx.appcompat.app.AlertDialog;
import androidx.appcompat.app.AppCompatActivity;
import androidx.fragment.app.DialogFragment;
import android.content.SharedPreferences;
import android.os.Bundle;
import android.preference.PreferenceManager;
import android.view.View;
import android.widget.Button;
import android.widget.TextView;


public class MainActivity extends AppCompatActivity {
    SharedPreferences sharedPref;
    SharedPreferences.Editor editor;
    TextView text;
    Button button, button2;
    DialogFragment deleteDialog;
    AlertDialog.Builder completeDialog;

    @Override
    protected void onCreate(Bundle savedInstanceState) {
        super.onCreate(savedInstanceState);
        setContentView(R.layout.activity_main);

      //共有プリファレンスを用意
        sharedPref = PreferenceManager.getDefaultSharedPreferences(this);
        editor = sharedPref.edit();
      //共有プリファレンスにデータ保存
        editor.putString("data", "DATA1");       //キー:data、値:DATA1
        editor.apply();

      //テキスト、ボタンを用意
        text = findViewById(R.id.textView);
        button = findViewById(R.id.deleteBtn);
        button2 = findViewById(R.id.updateBtn);

      //ボタンにリスナを設定
        StageListener listener = new StageListener();
        button.setOnClickListener(listener);
        button2.setOnClickListener(listener);

      //共有プリファレンスから取り出したデータをテキストに入れて表示
        text.setText(sharedPref.getString("data", "NO DATA"));

      //ダイアログを用意
        //yes,no選択画面(別途作成したもの)
        deleteDialog = new DeleteDialogFragment();
        //削除完了画面(ここで新規作成)
        completeDialog = new AlertDialog.Builder(this);
    }

    private class StageListener implements View.OnClickListener{
        @Override
        public void onClick(View view){
            int id = view.getId();
            switch(id){
                case R.id.deleteBtn: {
                  //アラートを表示
                    deleteDialog.show(getSupportFragmentManager(), "delete");
                    break;
                }
                case R.id.updateBtn: {
                  //テキストを更新
                    text.setText(sharedPref.getString("data", "NO DATA"));
                    break;
                }
            }
        }
    }

    //YESが押された場合の処理
    public void positive(View view) {
      //データ削除
        editor = sharedPref.edit();
        editor.clear();
        editor.apply();
      //ダイアログ非表示
        deleteDialog.dismiss();
      //削除後に完了メッセージをダイアログで表示
        completeDialog.setMessage("The data has been deleted.");
        completeDialog.show();
    }

    //NOが押された場合の処理
    public void negative(View view) {
      //ダイアログ非表示
        deleteDialog.dismiss();
    }
}
メインクラスにて作成したダイアログを呼び出しています
また、ここでは削除が完了した際にもう一つダイアログを表示させています
これはカスタムでない通常(?)の呼び出し方で表示させています
レイアウトファイル(xml)を作成
<?xml version="1.0" encoding="utf-8"?>
<androidx.constraintlayout.widget.ConstraintLayout xmlns:android="http://schemas.android.com/apk/res/android"
    xmlns:app="http://schemas.android.com/apk/res-auto"
    xmlns:tools="http://schemas.android.com/tools"
    android:layout_width="match_parent"
    android:layout_height="match_parent"
    tools:context=".MainActivity"
    tools:layout_editor_absoluteX="8dp"
    tools:layout_editor_absoluteY="-12dp">

    <TextView
        android:id="@+id/textView"
        android:layout_width="wrap_content"
        android:layout_height="wrap_content"
        android:textAppearance="@style/TextAppearance.AppCompat.Large"
        android:textSize="48sp"
        android:textStyle="bold"
        app:layout_constraintBottom_toTopOf="@+id/deleteBtn"
        app:layout_constraintEnd_toEndOf="parent"
        app:layout_constraintHorizontal_bias="0.5"
        app:layout_constraintStart_toStartOf="parent"
        app:layout_constraintTop_toTopOf="parent" />

    <Button
        android:id="@+id/deleteBtn"
        android:layout_width="wrap_content"
        android:layout_height="wrap_content"
        android:text="DELETE"
        app:layout_constraintBottom_toTopOf="@+id/updateBtn"
        app:layout_constraintEnd_toEndOf="parent"
        app:layout_constraintHorizontal_bias="0.5"
        app:layout_constraintStart_toStartOf="parent"
        app:layout_constraintTop_toBottomOf="@+id/textView" />

    <Button
        android:id="@+id/updateBtn"
        android:layout_width="wrap_content"
        android:layout_height="wrap_content"
        android:text="UPDATE"
        app:layout_constraintBottom_toBottomOf="parent"
        app:layout_constraintEnd_toEndOf="parent"
        app:layout_constraintHorizontal_bias="0.5"
        app:layout_constraintStart_toStartOf="parent"
        app:layout_constraintTop_toBottomOf="@+id/deleteBtn" />

</androidx.constraintlayout.widget.ConstraintLayout>
以上でカスタムダイアログ作成は終了です
お疲れ様でした!

コメント